Fense WordPress Plugin
How to use Fense on your WordPress site
Download Fense Plugin
Get the latest version for your WordPress site
Fense is a versatile security service that offers features like blocking proxies, VPNs, Tor networks, geolocation blocking, and referrer-based blocking. By integrating Fense directly into your website, you can take full advantage of its capabilities and enhance your website's protection.
01 Installation
Install the Plugin
Upload and install it via WordPress admin panel
wp-admin/plugin-install.php02 Configuration
After installing the Fense WordPress plugin, open Fense Options from the WordPress admin menu.
General Settings
Configure the main Fense plugin settings, API key, cache duration, Safe Mode, and the optional link shown to users.
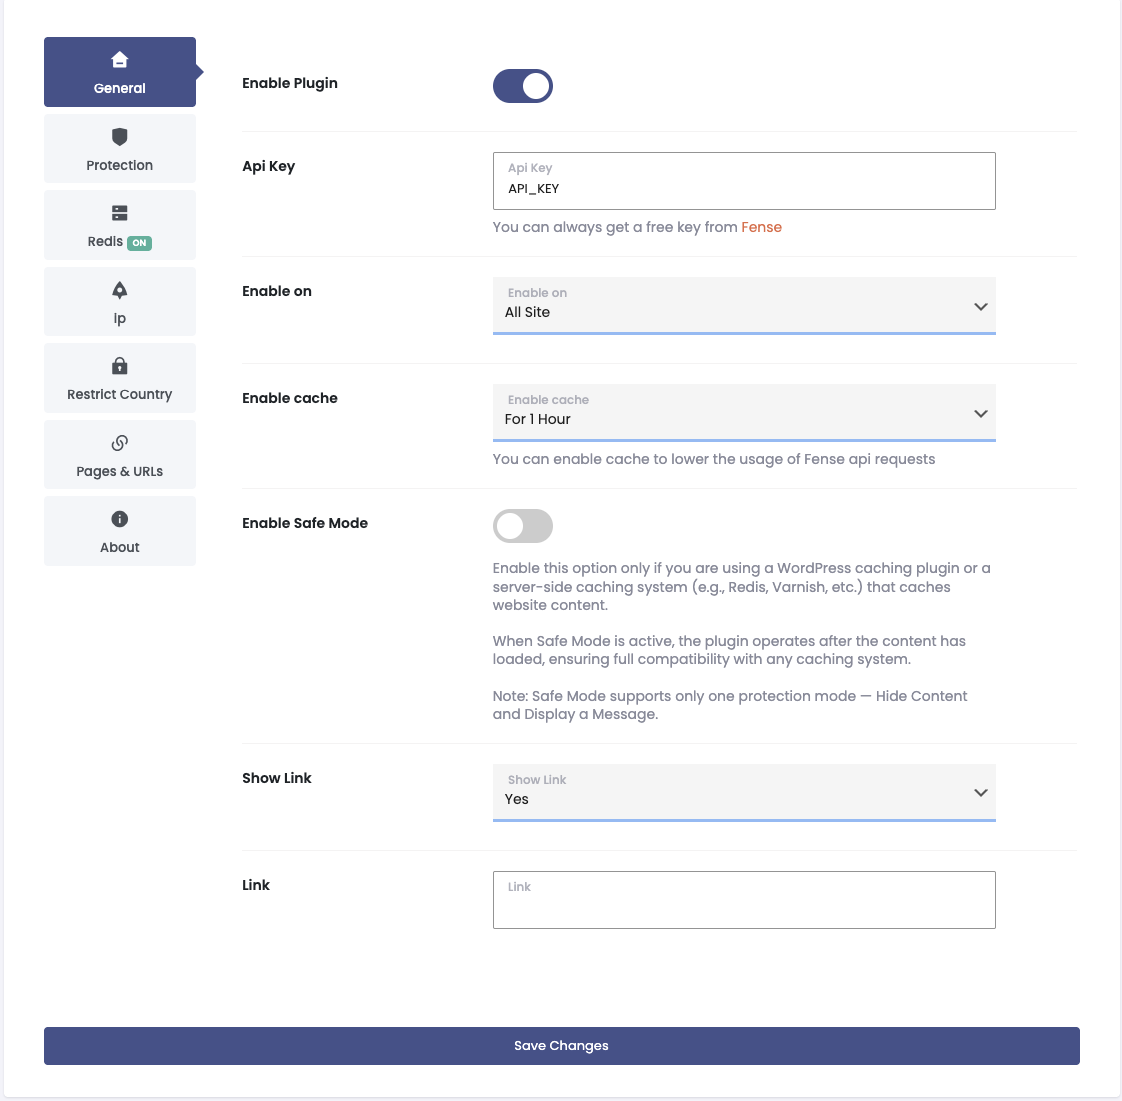
Enable Plugin
Turn Fense protection on or off using the plugin toggle.
API Key
Enter your Fense API key. You can get a free key from Fense.
Enable On
All Site: Run Fense across the entire site.
Custom: Limit where the plugin runs.
- Enable on logged-in users
- Enable on Posts
- Enable on Pages
- Enable on Login Page
These additional controls are shown when Custom scope is used.
Enable Cache
Cache Fense API results to reduce Fense API requests.
- For 1 Hour
- For 6 Hours
- For 12 Hours
- For 1 Day
- No
Enable Safe Mode
Enable this when a WordPress caching plugin or server-side cache system caches website content.
Safe Mode runs the plugin after the content has loaded to improve compatibility with caching systems.
Note: Safe Mode supports only one protection mode: Hide Content and Display a Message.
Show Link
Choose whether to show the configured link to users.
Link
Enter the URL that will be used when the link option is enabled.
Protection Settings
Configure the protection response and control which countries, referrers, and crawlers are handled by Fense.
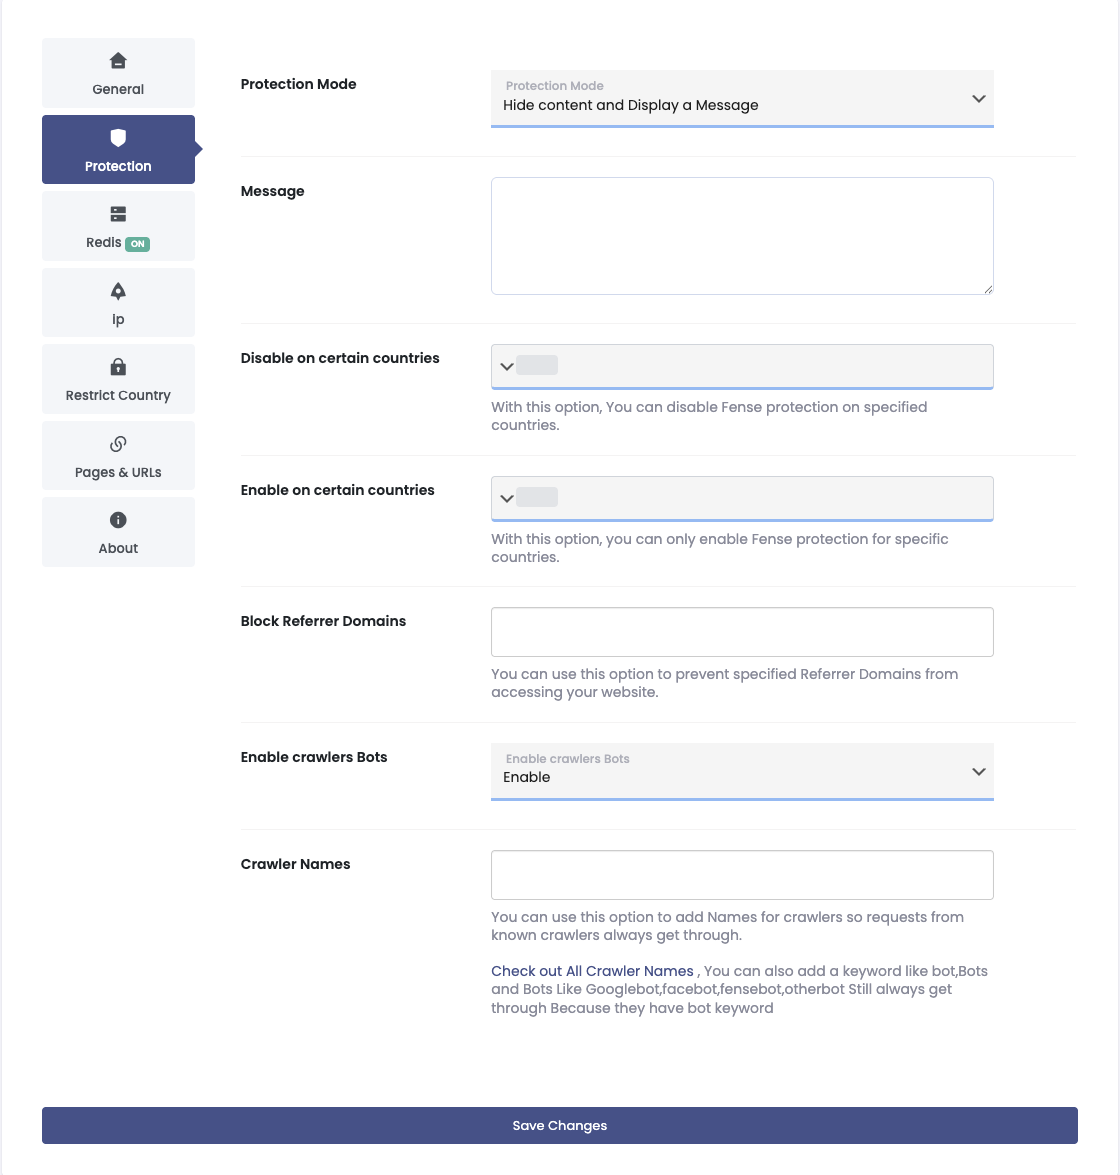
Protection Mode
Select how Fense handles protected requests. The interface provides Hide content and Display a Message as a protection mode.
Message
Enter the message that Fense displays when the selected protection mode blocks or hides the content.
URL
Destination used by the Redirect To Url protection mode. This field is conditional and appears when redirect protection is selected.
Ad Code
Code used with Hide Ads and Show content. Follow the Fense WordPress documentation for the required ad setup.
Disable on Certain Countries
Select countries where Fense protection should be disabled.
Enable on Certain Countries
Select specific countries where Fense protection should be enabled.
Block Referrer Domains
Add referrer domains that should be prevented from accessing your website.
Enable Crawlers Bots
Choose whether crawler/bot handling is enabled.
Crawler Names
Add crawler names used to recognize requests from known crawlers. The interface also notes that bot-related keywords can allow requests through when they are detected as bots.
Redis Cache
Redis is optional. Fense works without it, while Redis can keep IP lookup results in memory and reduce database load on high-traffic sites.
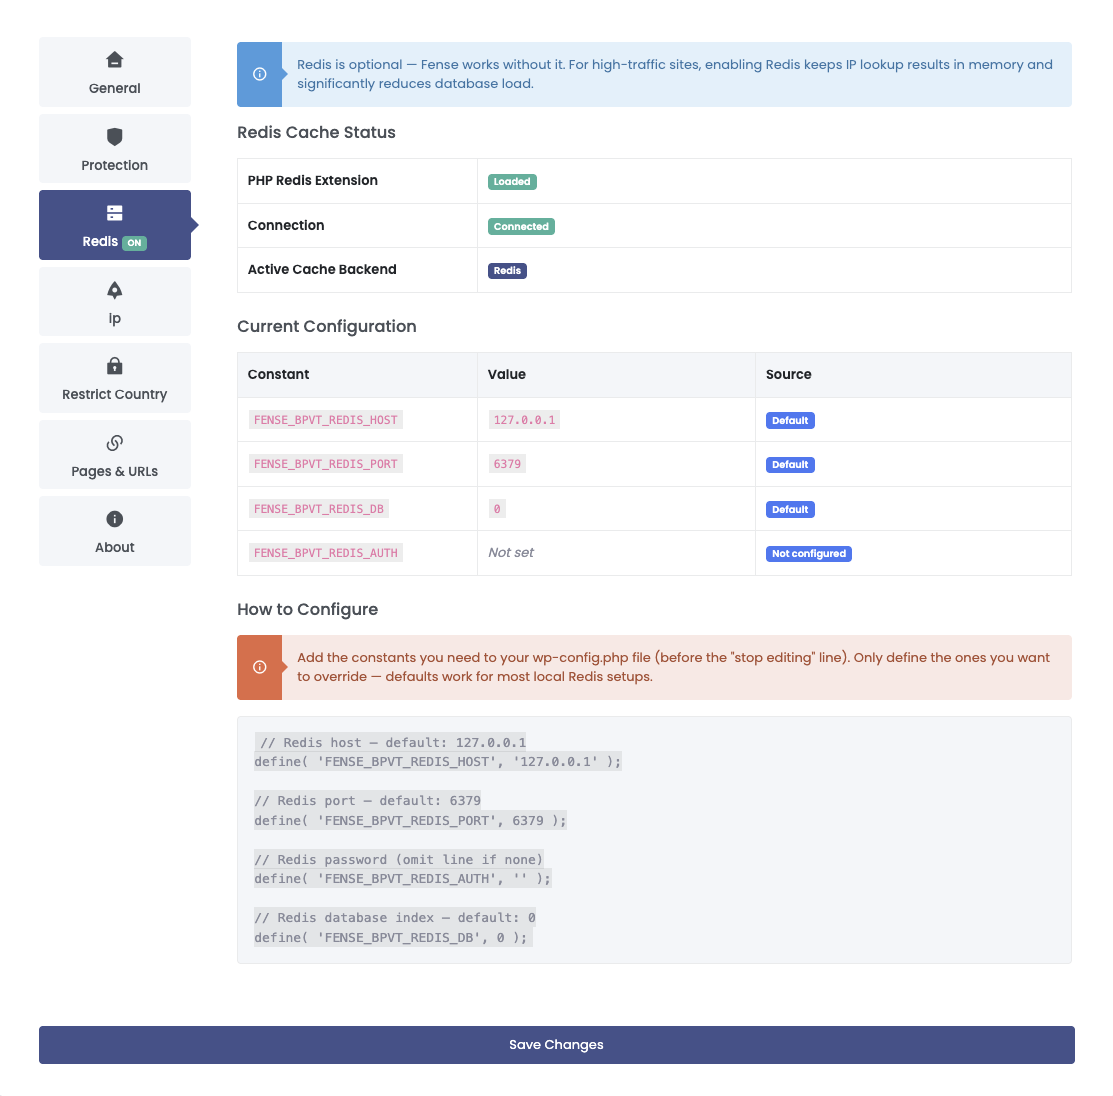
PHP Redis Extension
The Redis status page reports whether the PHP Redis extension is loaded.
Connection
Check whether Fense can connect to the configured Redis server.
Redis Configuration
Fense displays the current Redis configuration and its source.
FENSE_BPVT_REDIS_HOSTRedis hostFENSE_BPVT_REDIS_PORTRedis portFENSE_BPVT_REDIS_DBRedis database indexFENSE_BPVT_REDIS_AUTHRedis password, if configured
Defaults
The interface shows these defaults:
- Host:
127.0.0.1 - Port:
6379 - Database:
0 - Password: not set by default
Add the Redis constants you need to wp-config.php before the stop editing line. Only define the constants you want to override; the defaults work for most local Redis setups.
IP Whitelisting & Blacklisting
Control whether specific IP addresses or IP ranges are explicitly allowed or blocked by Fense.
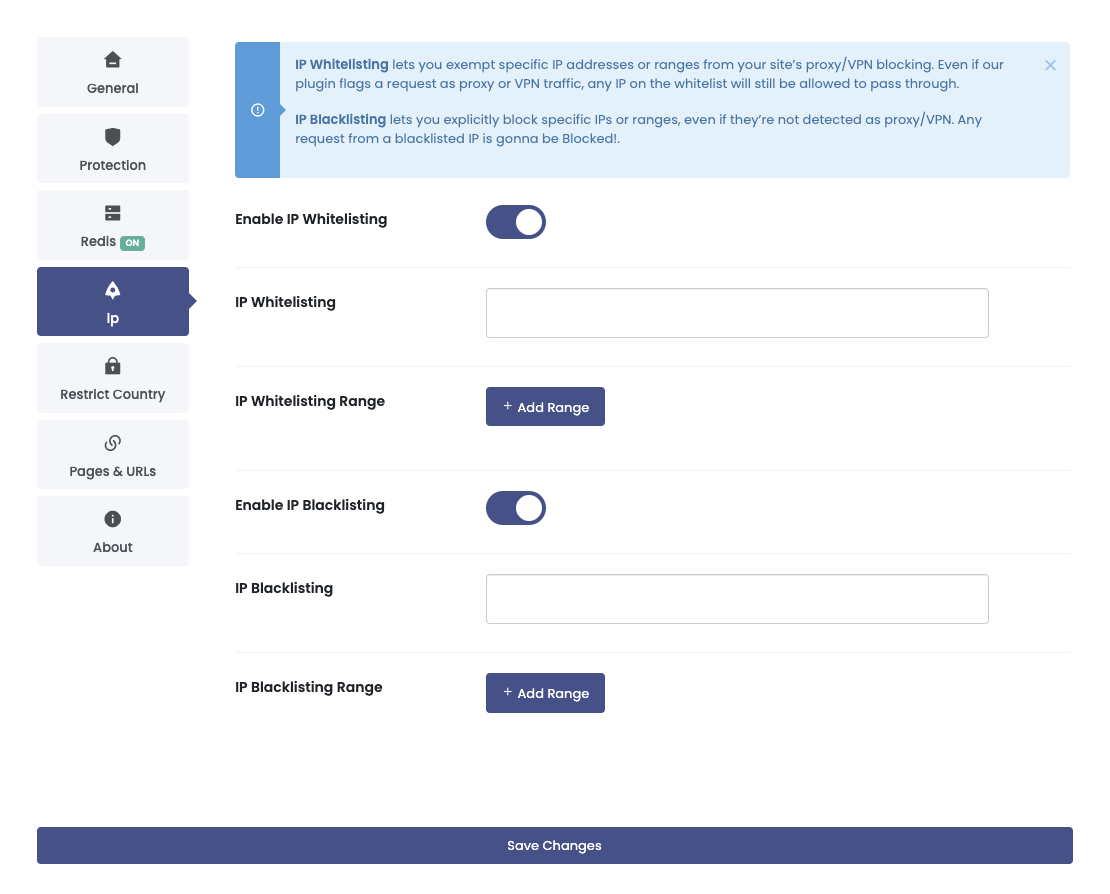
Enable IP Whitelisting
Enable explicit IP allow rules. Whitelisted addresses and ranges are exempt from proxy/VPN blocking.
IP Whitelisting
Add individual trusted IP addresses using the tag field.
IP Whitelisting Range
Add trusted IP ranges with Add Range.
Enable IP Blacklisting
Enable explicit IP block rules. Blacklisted requests are blocked even when normal proxy/VPN detection does not flag them.
IP Blacklisting
Add individual IP addresses that should always be blocked.
IP Blacklisting Range
Add blocked IP ranges with Add Range.
Restrict Country
Configure country-based access rules independently from proxy/VPN detection.
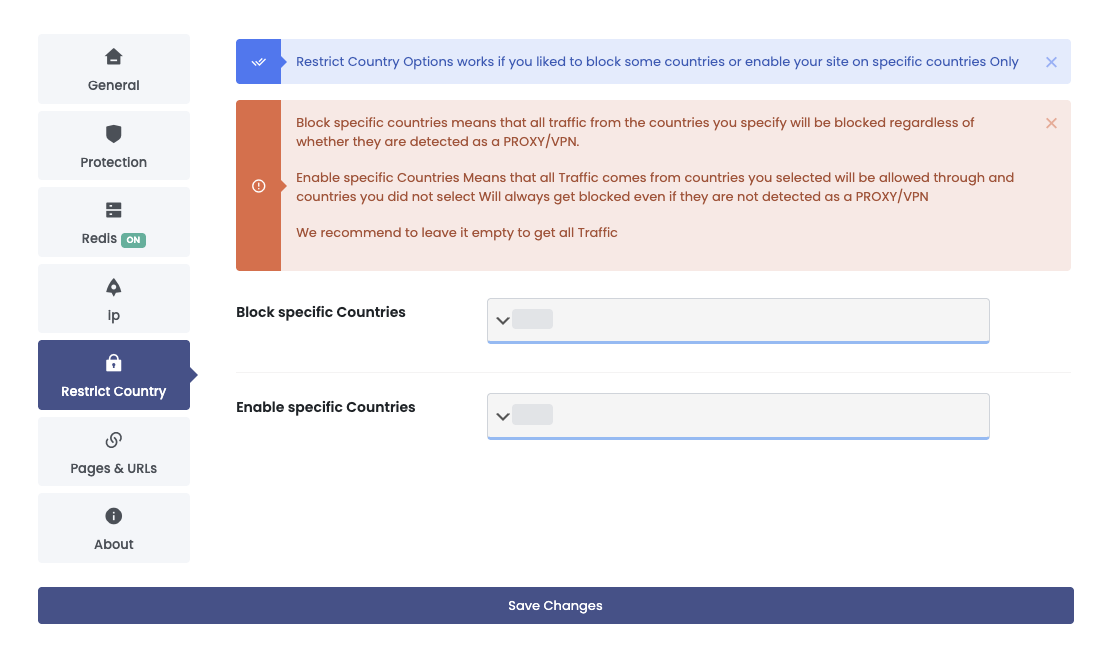
Restrict Country options can be used to block selected countries or enable the site only for selected countries.
Recommended: leave the country selections empty if you want to allow all traffic.
Block Specific Countries
Traffic from selected countries will be blocked regardless of whether the visitor is detected as a proxy/VPN.
Enable Specific Countries
Only traffic from selected countries is allowed. Countries that are not selected remain blocked even when they are not detected as proxy/VPN.
The plugin interface recommends leaving the country selections empty if you want to allow all traffic.
Pages & URLs
Control which pages and URL paths Fense detection runs on.
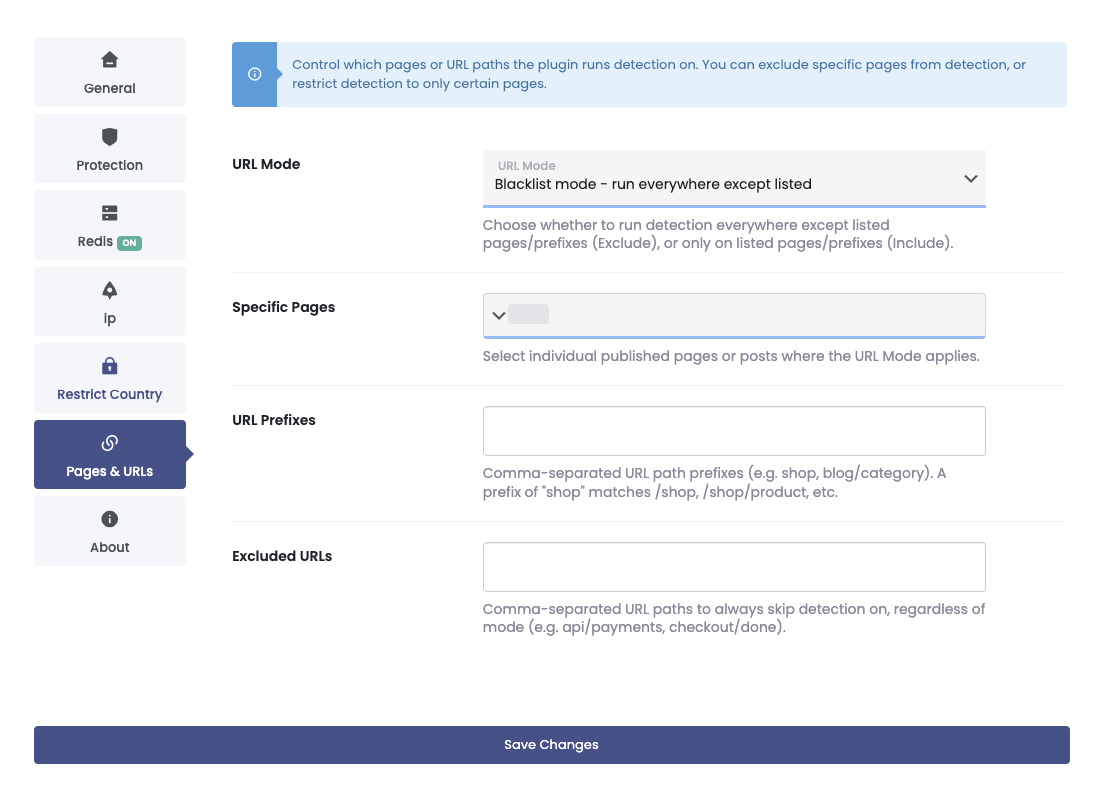
URL Mode
Choose how the selected pages and URL prefixes are handled.
- Blacklist mode: run everywhere except listed pages/prefixes.
- Whitelist mode: run only on listed pages/prefixes.
Specific Pages
Select individual published pages or posts where the selected URL mode applies.
URL Prefixes
Enter comma-separated URL path prefixes. A prefix such as shop can match paths such as /shop/ and /shop/product.
Excluded URLs
Add comma-separated URL paths that should always skip detection, regardless of the selected URL mode.